

The BEST Canned Pickled Beets
- Kelsey

- Jun 23, 2023
- 4 min read

When the first week of June hits, we get excited for BEET HARVEST!
**This post contains affiliate links. When you click on the links and purchase items, I receive a commission at no charge to you! Thanks for visiting the blog!**
Our beet process is inspired by my late Grandma's "Beet Pickles" recipe. My husband and I decided to start growing beets from seed a few years ago after the Father's Day fiasco, where I incorrectly measured the amount of whole cloves needed and my Dad ended up with a mouth so numb, he probably could have gotten dental work done and not felt a thing! I was determined to make up for that mistake with some correctly made beets that resembled Grandma's. When it came time to preserve them, I tried to "get into Grandma's head" while reading her recipe card, as it gave very basic descriptions on what to use and how to use it. (A.K.A. - no measurements!) We did some research and were able to finally reconstruct what she had written down into a very close version of what we believe she did years ago, using the exact canner we use today. Cue the sentimental music!
First off, you'll need to plan ahead and sanitize jars. We do this the easy way and use the dishwasher, but you can also use a pot of boiling water, dip each jar in for a few minutes, and make sure to use clean tongs to pull them out onto a clean towel. Usually, we like to use pint jars for beets, but quart jars also work great!
Once the beets are pulled from the ground, we immediately cut off the greens about 1 inch from the root. This helps keep them fresh if we need to store them, but we also do this so the beetroot doesn't bleed during the cooking process. We usually put them up the same day they are pulled from the ground. (DON'T THROW THOSE GREENS AWAY!)


We give them a good washing, pulling any straggler roots or dead greens off, and making them as clean as we can before adding to a pot of boiling water. Start a timer for 10 minutes.

This gives off a nice, earthy aroma in your home. :)
Once the beets have cooked in the boiling water for 15 minutes, they're ready to be taken out to cool. If you're done cooking beets, turn off the burner and leave the beet water in there. Grab an old towel, get your favorite veggie peeler, a good knife to cut the remaining stems and root end off, and a cutting board. (Maybe consider getting a red one!)
This next part gets a bit....graphic! Beets "bleed" a lot once they've been peeled and sliced. I recommend peeling first before cutting off the ends, as you have more to grip onto when they're still in tact. Then, I cut off the ends, make sure there's no residue on the beet and rinse if needed, and slice into 1/4 inch slices.


Add slices into a large, clean bowl. If your beets are large like some of ours tend to get (3-4" in diameter), slice them in half so they will fit easier into the jars. If they are 2" in diameter or smaller, you won't need to cut them in half.
Once you have all beets peeled, rinsed, and sliced, they're ready for the next step!
This is where we had to do some research and figure out how much pickling mixture to make for the amount of beets we grow. If you have a family member who has a recipe, I highly encourage checking with them to see if they'll share their recipe with you. Otherwise, you're welcome to try ours!
Yield: 4 Pints Beet Pickles
Ingredients:
20 medium beets (Average 1.5in diameter)
2 cups beet water (the water the beets were cooked in)
2 cups vinegar
1 1/2 tsp whole cloves
1 tsp cinnamon
1 1/2 cups sugar
Combine beet water, vinegar, cloves, cinnamon, and sugar together in a large pot over medium high heat for about 5 minutes. Add in sliced beets and bring to a boil.


After the beet mixture has boiled together, place jars on an old towel. Use a canning funnel to keep the rim of the jar as clean as possible and to prevent wasting any liquid. Carefully ladle an even mixture of beets and liquid into each jar.


Wipe each rim with a damp paper towel to clean off any excess liquid that may have escaped. Then, sanitize the jar lids. We add our lids to a small sauce pan of boiling water because it's easier to grab them out when we need them. Boil those for about 5 minutes, and grab with tongs to place on top of the jar. Be careful not to touch the underside of the lid.


Once the sanitized lids have been placed on top, it's time to add the rings! You'll want to turn the rings until they're tight, but not too tight. You want the air to escape after the water bath so it seals properly. Then, carefully take each jar and wipe down the outside.


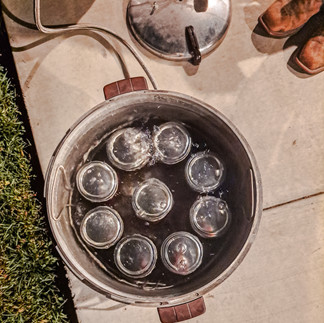
At last, it's time for the water bath! If using a turkey fryer burner like we do, carefully take the jars outside on a cookie sheet and set them down. Using a canning grabber, place each jar into the canner for a water bath, making sure there is enough water so that the entire lid is covered. Water bath for about 20 minutes. When they're done, carefully grab them with the canning grabbers.


Allow them to sit for 12 hours (or overnight) before labeling with the date and moving them to storage, paying attention closely to the lids to make sure each sealed properly. We have never had any issues with beets sealing. If the lid did not seal (the middle is popped up), you can either refrigerate them or remove the defective lid and replace it with a new sanitized lid, and reprocess that jar again. If you'd rather refrigerate them, allow the beets to sit in the brine for at least 1 week before enjoying!
Once they are sealed and labeled, keep them stored for two weeks to let the brine do its thing. Refrigerate after opening! Beets that are sealed will keep for a long time, but we recommend eating them within 12 months.
Our recipe is a family recipe, and we are not liable for any malfunctions that may occur if used.


Comments